I found this bread box at a yard sale in May of 2012 for $8.00. The lady having the yard sale had done the crackle finish on it.


Ladies, Thank you for hosting!!

I liked it since the taupe and cream blended well with my counter top, so I've used it this way ever since I bought it.
This morning, I was in the mood to be a little creative, so I decided to give the bread box a makeover. I had all the paints and supplies in my stash, so this upgrade cost me nothing. You can see below, that the box had a low sheen. Since I wanted to give it a distressed look, I didn't sand or anything. I wanted some of the colors to show through the new paint color.

I gave it a "messy" paint technique, not quite a dry-brush, but a look where the brush strokes showed.

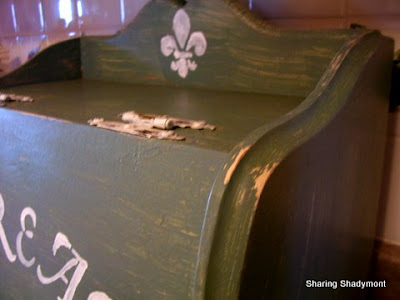
I painted the hinges and knob with a white acrylic paint then took some of the paint off with a steel wool.

Before the paint was totally dry, I used a fine steel wool to distress the edges.

Notice how prominent the brush marks are, just like I wanted them. Some of the brown/white shows through. The scalloped edge of the back was just begging for something, so I stenciled my favorite fleur de lis there. As usual, I didn't measure for placement of any of the stenciling I did. I'm bad to just eyeball something and if it's halfway ok, I just go with it. Next I stenciled "BREAD" on the front. I painted the 'E' first, centering it over the knob, then the AD, then the R, and finally the B. It came out pretty good what with just eyeballing the placement.

Not exactly perfect, but neither am I! :)


While I had all my paints out, I went ahead and gave the knife block an update too!

I think this may be my new favorite makeover!! I really like this color, and have been using it in lots of projects recently. It's Redwood Blue Spruce/Valspar sample.

I like the pop of color it adds to the counter top.

Have you done a frugal makeover recently? It's so much fun, and is a great creative outlet, especially when you don't want to do a big project. Give it a try, then share what you did with us!
Sharing this project at:
Show And Tell Friday @ My
Romantic Home
Frugal Friday @ Shabby
Nest
Feathered Nest Friday @ French
Country Cottage
Be Inspired Friday @ Common Ground
Ladies, Thank you for hosting!!
Love your breadbox makeover! You did a good job distressing it. The fact that it didn't cost anything is just icing on the cake! :)
ReplyDeleteYour bread box came out so cute!
ReplyDeleteYou did a really nice job with your breadbox makeover. It looks so cute on your counter. I'm having a blog anniversary giveaway, so if you're interested in entering stop by!
ReplyDeleteOh it looks so fabulous! Love what you did to it!!
ReplyDeleteI love it and you did a great job on the makeover. I have a breadbox almost just like this and it needs a makeover! :)
ReplyDeleteThanks for popping in to see me.
be a sweetie,
Shelia ;)
Looks lovely.
ReplyDeleteSherry