Ever since we did the furniture shuffle a couple months ago when we put the king sized bed in the master, I haven't been happy with the furniture arrangement in the guest room. I am happy to be able to have matching furniture for that room, but the dresser was covering one of the windows.
The room has some quirky angles which makes arrangement difficult, but I just couldn't stand the window being covered.


The room has some quirky angles which makes arrangement difficult, but I just couldn't stand the window being covered.

I wanted to place the head of the bed between the two windows on that wall.
BEFORE

Yesterday morning I went to Lowe's and purchased new curtain panels at $14.97 each, to replace the white panels I had up.
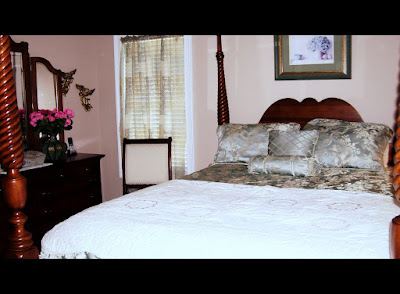
Here is a photo showing the new panels.

These panels capture the taupe of the walls and the turquoise of the bedding.
AFTER

This shows the bed placed between the two windows.


The bed now faces the doorway (left). I think this is better.

After I finished rearranging everything and hanging the new panels, I decided to redo a vintage table I have and add it in the mix.
While at Lowe's I picked up some Valspar Paint Samples on clearance for $2.68 each. I decided I would just paint the top of the table with this, Valspar Sea Mist. I put one light coat on the top of the table, then while the paint was still wet, I used a sponge 'brush' to dry brush the tabletop. Once this dried, I sanded it to give it some character. Here is the finished product.

I am so pleased with how it turned out.

Here you can see how using the dry brush to remove excess paint made it look.

I shopped the house for items for the vignette.
The picture was a gift to me. It shows a little boy in a farm wagon pulled by a horse/mule.
The 'nest' is packing material from a gift box we received in the mail, and the bird is from a consignment shop a long time ago. I made the plate pedestal, and the rabbit is a computer print off tied on the candle with string.

I am so pleased with the look it brings to the guest room. To me, it seems more relaxed and welcoming.

Here you can see the french door leading to the screened porch. This window was completely covered with the previous arrangement.
I think I should get a matching panel for the door.

I played around with the vignette on the dresser as well.


I added a bolster pillow from the bed to the chair.
This vintage lamp belonged to my MIL.

The bolster fabric repeats the lattice look of the chair upholstery.
What do you think, does the table make the room more welcoming?
Please visit these parties where I will be sharing this makeover.
Feathered Nest Friday @ French
Country Cottage
Be Inspired Friday @ Common Ground
Serenity Saturday
@ Serenity You
Show and Tell Saturday @ Be
Different, Act Normal
Bouquet of Talent @ Life on Lakeshore Drive
Share It One More Time @ One More Time Events
What a beautiful job you did and I'm so glad to hear that I'm not the only one who gives furniture "character"!...:)JP
ReplyDeleteLove this post, those new panels are gorgeous and I love the comforter. Great job!
ReplyDeleteAlso wanted to drop you a quick note....there is a "liebster award" that is supposed to help fellow bloggers get their word out...and maybe find more link buddies and I have nominated you for it. :-) If you'd like to participate please drop by...
http://cgtablescapes.blogspot.com/2013/03/liebster-award.html
I really like your changes and love the touch of turquoise. Have a great weekend and Happy St.Patrick's Day!
ReplyDeleteI love the new arrangement. Perfect! That little antique table and vignette are both so sweet. Your guest room looks amazing!
ReplyDeleteKaren
I really like the changes you've made.......and the painted table is awesome!!!
ReplyDeleteSo pretty! You have a great touch for this! Following via GFC.
ReplyDeleteI think this room is so lovely,I'm sure any guest would love it too. The little table sets it off a treat. Yes I think matching curtains for the French window would just complete it. x
ReplyDeleteGee Kathy, when you get going, you really get things done. The new arrangement is so much better. I wouldn't be able to stand having a window covered either. That new table color is so soothing and I love the little wood tray on the dresser. It's all so comfy and inviting!
ReplyDeleteLiz
How pretty Kathy - such a serene room. As you know, I am starting to redo our guest room also, and if I am lucky it will turn out as welcoming as yours! Pretty window treatments, you really got a bargain at Lowes. Jane
ReplyDeleteKathy, you did a fabulous job! Everything looks so beautiful. I love the new table color. That color is so pretty. Just pinned it. Thank you so much for sharing at A Bouquet of Talent! So thrilled you shared with us! I just love your blog. Happy Friday!! YAY!! :)
ReplyDeletehugs
Kathy